With the 3D Gizmo, it's easy to select, move, and rotate objects in 3D.

Select Objects
In the 3D view, multiple object types can be selected and moved, including shapes created in the House and Custom Shapes stages as well as most library items. Once selected, these objects can be moved, rotated, and scaled using the 3D Gizmo.
Selecting by Left-Clicking: Double-left-click to select an object in 3D. The view will rotate to focus on the selected object, which will be highlighted in red.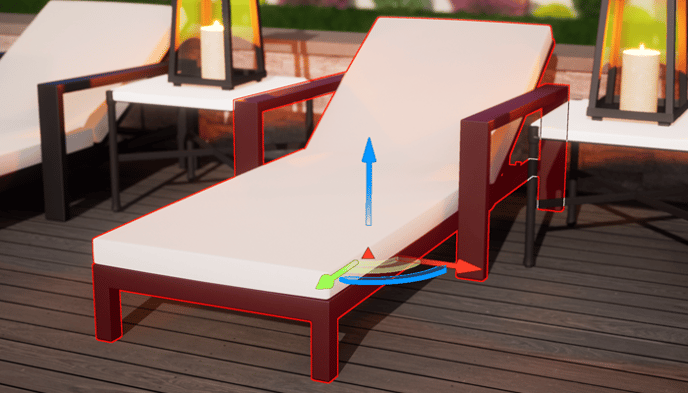
TIP: Disable your camera to prevent it from automatically focusing on an object. Open the Configuration menu (press F7), click the 3D Settings tab, and disable "Focus Camera on Selected Object."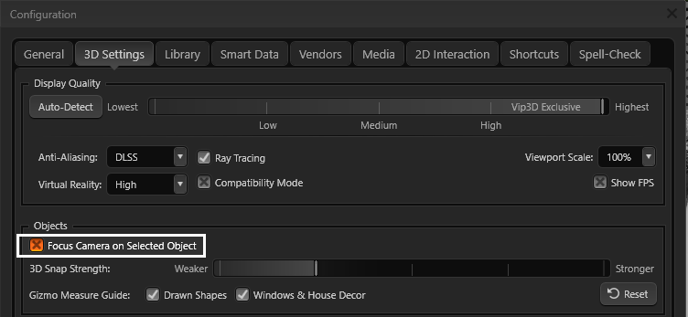
To select multiple objects, press and hold the CTRL key as you single-left-click each object you want to select. To subtract an object from the current selection, left-click it again while holding the CTRL key.
Selecting with the Selection Marquee: The selection marquee makes it possible to select a group of objects easily with a single mouse movement.
First, press and hold the Shift key on your keyboard. The cursor will change, indicating that it is activated. While continuing to hold the Shift key, left-click and hold any point in the viewport. Continue to hold the left mouse button as you begin to drag your mouse. You will notice the selection marquee being created and expanding as you move your mouse.
When you release the left mouse button, all objects inside the selection marquee will be selected. Your view will rotate to focus on these selected objects, which will be highlighted in red.
To select more objects with the selection marquee, press and hold the CTRL and Shift keys while following the same steps above. To deselect the items, press the Reset button at the top of the screen.
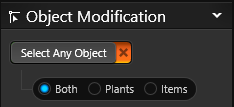
TIP: Optimize the selection process. To make sure the marquee tool doesn’t select unintended objects due to perspective, go to “Object Modification” and disable the “Select Any Object” option.
Move Objects: Basics
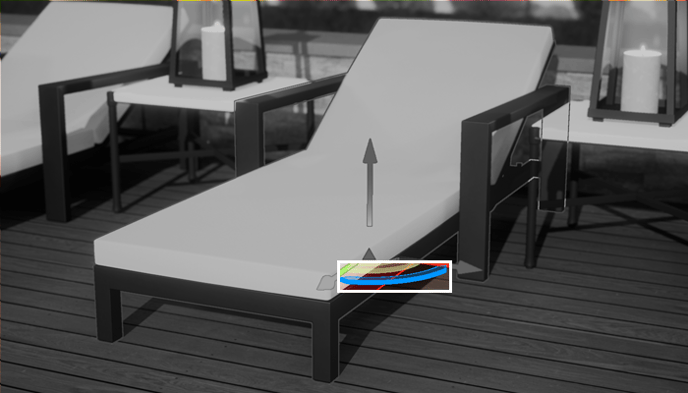
When you need to move single objects, multiple objects, or groups, the 3D Gizmo makes it easy to move the objects you select.
While the Move tool is selected (Keyboard Shortcut Q), arrows will be visible:
- Blue Arrow: Move objects up and down.
- Red and Green Arrows: Move objects left and right or back and forth.
- Yellow Area between Arrows: Move the object on the elevation plane in any direction.
As you move the cursor over an arrow, it will highlight. Left-click and hold to move the object. You can also use the elevation box in the Panel to elevate objects manually.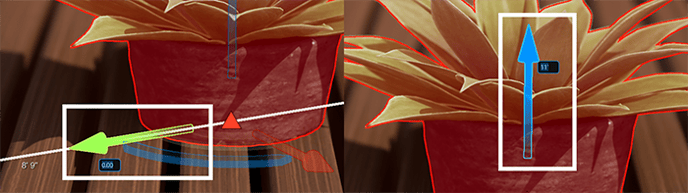

To turn Auto Elevation OFF or ON when the Move tool is active, click the triangle at the center of the Gizmo.
- Auto Elevation OFF: The triangle is red and points up.
- Auto Elevation ON: The triangle is green and points down.
- Manual Elevation: Enter the elevation manually under Object Settings in the Panel.
Move Objects: Distance Guides in 3D
When placing an object in 3D, use the displayed distance guides to determine the object's proximity to other objects or to position it accurately within a drawn 3D shape. These guides simplify the process of spacing objects and aligning them with existing shapes. For example, you can use them to easily center a fire pit in a circular hardscape without switching to the 2D view.
Go to Configuration > 3D Settings > Objects "Gizmo Measure Guide" to turn the guides on or off.
Move Objects: Type-In Distances
You can also type in measurements to move an object. When an object is selected, hover the mouse cursor over the arrow. Then, simply type in the distance you would like the object to move in that direction.
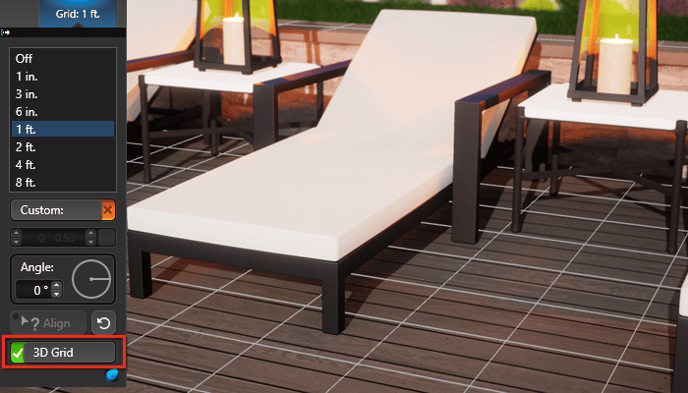
3D Grid
Enable the 3D Grid to enhance precision in the 3D view. This grid will align with the existing 2D grid, providing consistent reference points for accurate positioning of objects.
Duplicate Objects: Shift + Drag
To duplicate the currently selected object, hold Shift and drag the Red, Green, or Blue arrow. The selected object will be aligned along the same axis, making it the perfect way to create rows of identical objects like chairs, railing posts, lights, or even pillows.
The Gizmo will automatically align objects along the same axis based on the distance between the first two objects. For example, if you want to place a row of bushes spaced 4 feet apart, use Shift + Drag to place the second bush 4 feet from the first bush. Each subsequent bush will snap into place with the same 4-foot spacing.
The Gizmo will also automatically vary duplicated plants and trees, enhancing the natural appearance of organic objects. Each subsequent plant will be a new variation with a random rotation and a scale change of +/- 5%.
It's important to note that this only applies to 3D plant or tree models; it does not affect the size, style, or rotation of 2D symbols.
In the Configuration settings, you have the option to enable or disable the automatic variation of plants and trees. Go to Configuration > Library > Objects and toggle on or off the "Randomize 3D landscaping on copy/paste" feature.
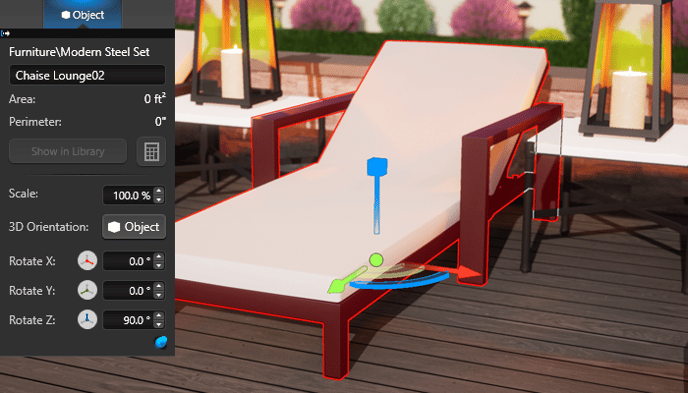
Rotate Objects
There are multiple ways to rotate an object.
When the Move tool is selected (keyboard shortcut Q), you can quickly rotate an object on the ground plane with the blue rotate arrows, which are always visible. This rotates the object the same way as in the 2D viewport.
When the Rotate tool is selected (keyboard shortcut W), you have more options in the 3D viewport than in the 2D viewport.
The 3D rotate tool can rotate the selected objects on the red and green rotation arrows, allowing you to tilt objects upright.
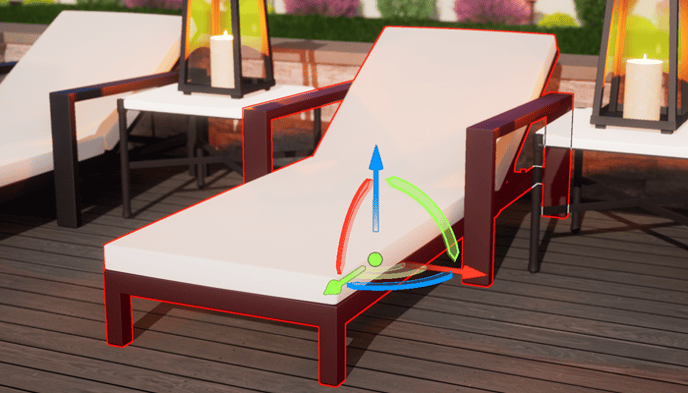
Objects will rotate based on your Angle Snap settings.
Select the object you want to rotate, move the cursor over the arrow, click and hold the left mouse button, and drag the mouse to rotate the object. To complete the action, release the left mouse button.
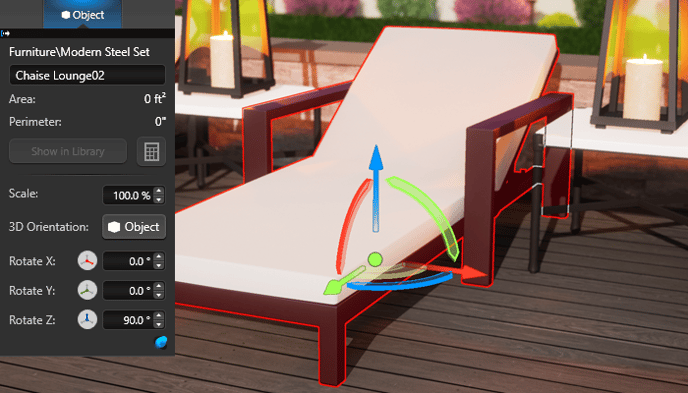
Alternatively, you can type in your desired rotation: simply hover the mouse over any axis and type the degree of desired rotation.
The red and green arrows only rotate shapes drawn in the Custom Shapes stage or items inserted from the library. Shapes drawn in the House stage as well as certain items from the library (such as house decor items) may be rotated only with the blue arrows. Multiple objects and groups can be rotated the same way.
Please note that the rotation options for a group may limited by items in the group. For example, if a group contains shapes drawn in both the House stage and the Custom Shapes stage, the group as a whole will be able to rotate only with the blue arrow.
You can also rotate objects by using the Rotation box found under Object Properties.
Scale Objects
When the Scale tool is selected (keyboard shortcut E), scaling objects in the 3D viewport is very similar to scaling them in the 2D viewport. You can scale the selected objects uniformly.

Hover the cursor over the blue cube on the 3D Gizmo.
Left-click and hold + drag the mouse to scale the selected objects. Release the left mouse button to complete the action.
Alternatively, you can type in your desired scale. For example, if you would like your object to be 50% larger, type "150" and press "Enter."
You can also scale objects by using the Scale box found under Object Properties.
World and Object Alignment
When the Rotate Tool is active, the Alignment Button (represented by a globe or a cube) in the center of the 3D Gizmo allows you to change the orientation of the arrows. The alignment can only be changed when the Rotate tool is active. To change the setting, left-click the button.
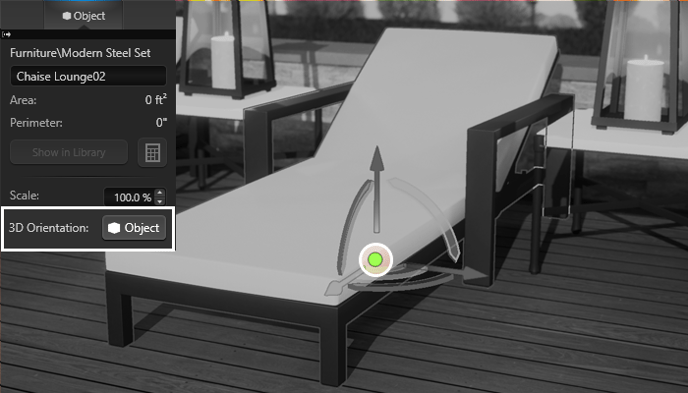
- The Globe represents world alignment; the arrows will be orientated to the world. Note: "World" is always on for Plant and Tree objects and cannot be changed.
- The Cube represents object alignment; the arrows will be orientated to the position of the object.