Smart Data delivers easy-to-read, easy-to-use breakdowns of complex calculations.
About Smart Data
Smart Data goes beyond traditional, generalized formulas by utilizing 3D math to accurately determine calculations. By considering the exact scale of the shape and its interaction with other shapes, smart data provides a much more precise result.
🚫 Example: The old industry standard formula to calculate pool gallonage
- Measure the length, width, and average depth of the pool in feet. The average depth is calculated by adding the deepest and shallowest depths together and dividing by two.
- Calculate the volume in cubic feet: Multiply the length, width, and average depth together.
- Convert cubic feet to gallons: Multiply the cubic feet by 7.48
✅ Smart data: The new industry standard pool gallonage calculation
- Select the Pool Shape, and choose "Smart Data"
- The pool volume calculators works on any size and any shape swimming pool taking into account the pools steps, benches, cove radius, water level, intersecting spas, sunken seating areas, swim up bars, etc. It's a 3D volume calculation.
- This modern gallonage calculation can appear vastly different than the old formula, however it's more accurate in every way.
Smart Data
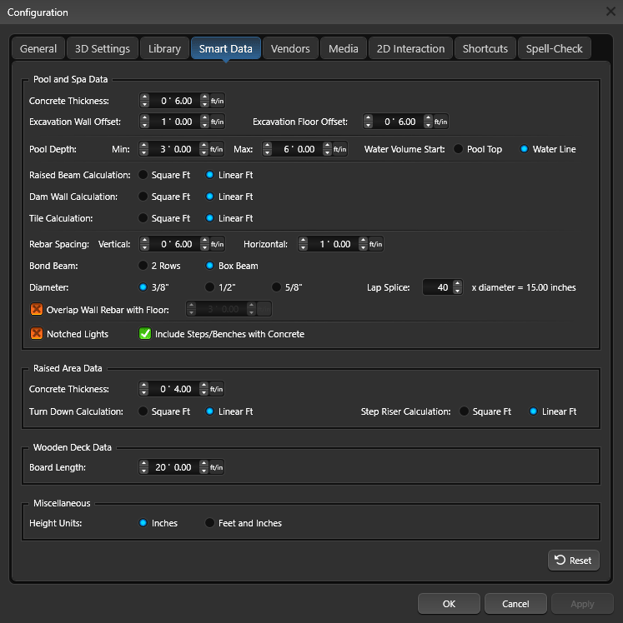
Before starting a project, it is important for contractors to calculate and construct projects according to their own methods. It is crucial to ensure that your Smart Data settings in Configuration (Press F7) are aligned with your specific construction principles. Review each setting carefully.
It is important to compare these calculations with the actual material usage from recent projects before using them for pricing. This will help ensure that your estimates are as accurate as possible.
It is always recommended to add more than the exact numbers provided. It is not possible to calculate real-world challenges such as voids, over excavation, settlement, etc. Additionally, these calculations may be different from what your subcontractors are accustomed to bidding on.
Calculations
Below is a comprehensive list of factors that are taken into consideration and those that are not when making calculations.
 Perimeter: Linear measurement of the outline of the object. For pools and spas, the interior of the shape is measured (excluding the lip). This measurement is affected by intersections with other shapes.
Acres: Total acres inside a complete shape drawn in Project Information: Property Line.
Area: Surface area of the shape. This measurement is affected by intersections with other shapes.
Int Surface Area: Interior Surface Area of Pools and Spas. Surface area includes the faces of raised beams and steps and benches.
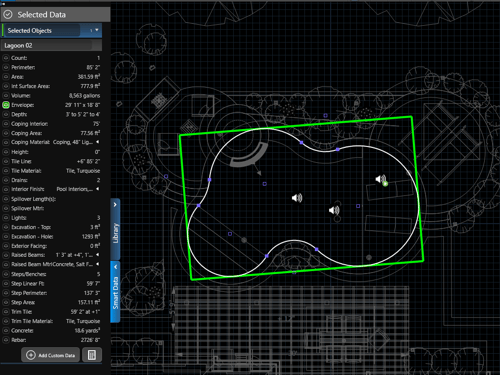
Volume: (Pools, Spas and Water Features) Gallon capacity measured by rendering the depth values of the shape. Go to the Configuration Menu (Press F7) to set the calculation from either the waterline or top of the lip. This calculation is affected by intersections with steps, benches, and other shapes, and adjusted Lip Heights if Water Volume Start is set to Water Line.
Coping Interior: (Pools, Spas, Water Features and Decks/Hardscapes) Linear measurement of the inside of the coping. This measurement is affected by intersections with other shapes.
Coping Area: (Pools, Spas, Water Features and Decks/Hardscapes) Surface area of the shape’s coping.
Measurement: Length of measurement guide.
Linear Ft: Linear measurement of the shape.
Steps/Benches: Count of steps and benches inside the pool or spa.
Spillover Length: Linear measurement of each spillover or negative edge in the pool or spa. Each spillover is listed separately.
Envelope: Dimensions of the smallest rectangle completely enclosing the pool or spa.
Depth: (Pools) For single pool slopes, this displays the first and last points on the depth slope from left to right. If the depth slope has more than two points, it will average the depth and display the value in the format “first to average to last.”
For multiple pool slopes, this will display the shallowest and deepest points in the pool.
Depth: (Spas and Water Features) Depth of the spa or water feature.
Height: Height of the pool, spa, water feature, or deck/hardscape.
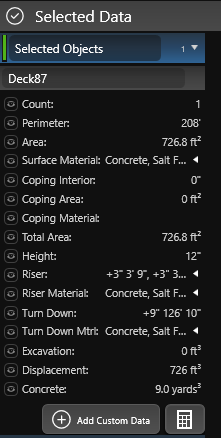
Displacement: (Decks/Hardscapes) Calculates the volume of earth to be added or removed in order to build the deck or hardscape at its specified height.
For Pool and Spa displacement, refer to Excavation.
Turn Down: Displays either the linear measurement or surface area of all deck/hardscape edges that border the terrain. This calculation excludes the lip, but adjusting Lip Height will add or remove from Turn Down value. Go to Configuration Menu (Press F7) to select square ft. or linear ft.
Step Riser: Displays either the linear measurement or surface area of all deck/hardscape edges that border another deck/hardscape. This calculation excludes the lip, but adjusting Lip Height will add or remove from Step Riser value. Go to Configuration Menu (Press F7) to select square ft. or linear ft.
Dam Wall: Displays either the linear measurement or surface area of all spa edges that border a pool. This calculation excludes the lip and tile line. Go to Configuration Menu (Press F7) to select square ft. or linear ft.
Exterior Facing: Displays the surface area of all edges that border a non-water surface. This calculation excludes the lip.
Raised Beams: Displays either the linear measurement or surface area of all deck/hardscape edges that border and are above a pool, spa or water feature. This calculation excludes the lip and tile line. Go to Configuration Menu (Press F7) to select square ft. or linear ft.
Step Linear Ft: Linear measurement of all front edges of all steps with the pool and spa. This measurement is affected by intersections with other steps.
Concrete
Displays the volume of concrete necessary to build the hardscape, pool, spa or water feature. Any raised walls are calculated at double thickness. Added to this is a double-thick layer of concrete 6″ down to the ground along each edge and an 8″ curved wall where the wall meets the bottom for smooth edges. Go to Configuration Menu (Press F7) to select your concrete thickness.
A pool shape cannot currently account for multiple concrete thicknesses, such as thicker concrete needed past the break of a diving pool.
Notched lights add 1 yard of concrete, each pool or spa drain adds 1 yard of concrete.
Deck/hardscape concrete calculation is the area multiplied by the depth set in Configuration (default 3”). Extra concrete for turn downs or footings are not included.
NOTE: There is no way to calculate real-world challenges, such as voids, over excavation, settlement, or rock displacement.
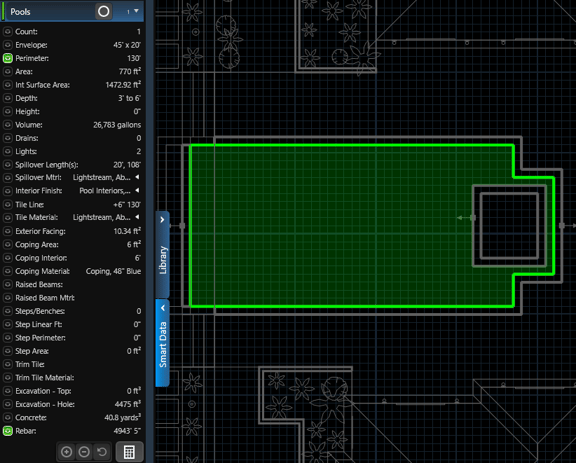
Pool and Spa Rebar
Displays the vertical and horizontal rebar on the walls and floor. Overlap is calculated and applied based on your rebar settings. Rebar calculations also account for rebar on steps and benches. Go to Configuration Menu (Press F7) to select your rebar settings.
When two shapes, such as a pool and spa touch, the rebar on the intersecting line will be divided between the pool and spa. Select both the pool and spa to see the full calculation.
Rebar will be doubled on walls that hold back water, such as a raised pool shape. If Terrain is lowered around a pool shape, rebar will extend to the lowest point of the terrain on the pool shape.
Notched lights add 20’ of rebar. Each pool or spa drain adds 20’ of rebar.
A single pool shape cannot currently account for multiple rebar thicknesses, such as a load-bearing wall or the additional rebar needed past the break of a diving pool.
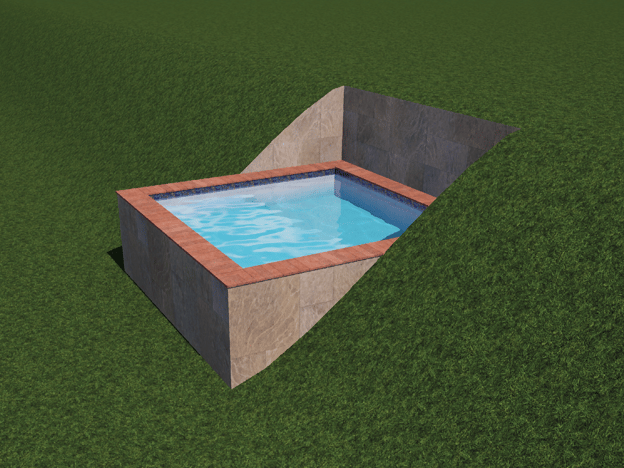
Pool and Spa Excavation (Dirt Displacement)
The pool excavation feature displays the amount of dirt that needs to be displaced for both pools and spas. This calculation takes into account various factors such as the radius of the pool cove and the terrain. To gain a better understanding of how the design impacts this calculation, it is important to review each of the examples provided below.
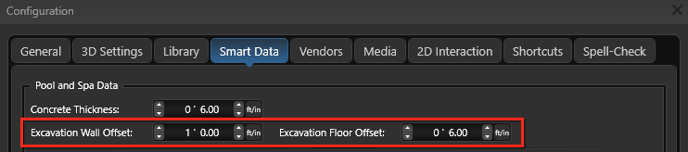
Excavation Configuration Settings
In the Smart Data tab of Configuration, you will find two options: "Excavation Wall Offset" and "Excavation Floor Offset". These values allow you to adjust the size of the hole used for calculating the excavation of pools and spas. By increasing these values, you can account for any additional space needed for the excavation process.
After you have configured your settings according to your construction process, it is important to review the following examples to gain a better understanding of how the design impacts this calculation.
Example 1 - Pool Cove Affects Excavation
-
To configure the excavation settings, set both the wall offset and floor offset to 0.
-
Next, draw a 10’x10’ pool and set its bottom slope to 4’ (flat).
-
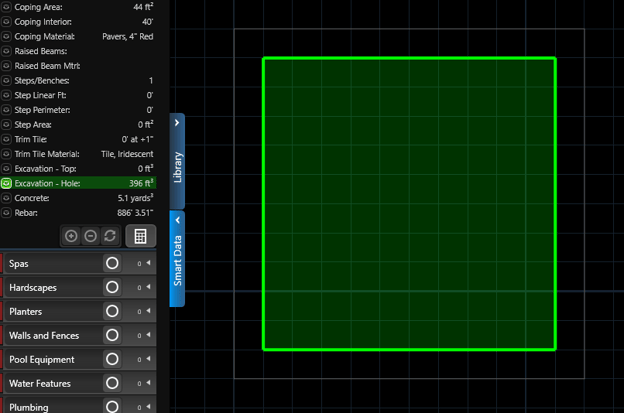
Open the smart data panel and observe that the excavation is calculated to be 396 cubic ft, which may seem incorrect.
-
Pool Cove is affecting this calculation. Turn off the "Pool Cove" option in the panel and recalculate the smart data. Now, the excavation will display the expected value of 400 cubic ft, as it should be for a 10’x10’x4’ pool.
Example 2 - Wall Offset
- To account for the pool cove, ensure that the Pool Cove option is turned off.
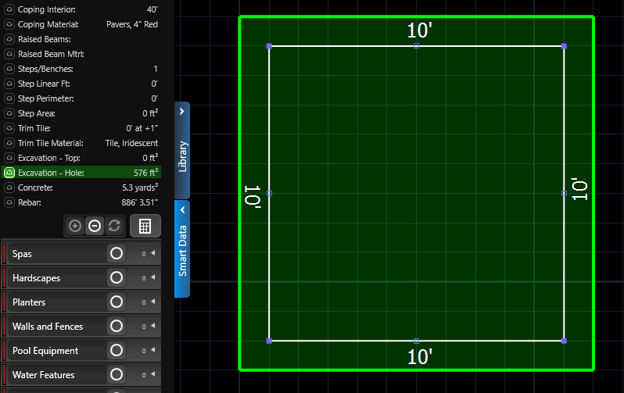
- In the Configuration menu, set the wall offset to 1 ft and the floor offset to 0.
- For a 10’x10’ pool with a flat depth of 4’, the excavation will now be calculated as 576 cubic ft. This calculation is based on offsetting the wall by 1 ft in all directions, resulting in a shape of 12’x12’x4’.
- Additionally, note that the smart data visualization will now reflect the impact of the foot offset.
Example 3 - Steps and Benches
-
To ensure accurate excavation calculations, make sure the "Pool Cove" option is turned off.
-
In the configuration settings, set both the wall offset and floor offset to zero.
-
If you want to add a 1 ft. bench around the perimeter of the pool, set its depth to 2 ft. Keep in mind that this excavation calculation does not include the steps and benches, as they are assumed to be not dug out.
-
After making these adjustments, you will notice that the excavation volume decreases from 400 cubic ft. to 328 cubic ft., which is equivalent to the pool's volume.

Example 4 - Wall Offset with Steps and Benches
- Same setup as in Example 3.
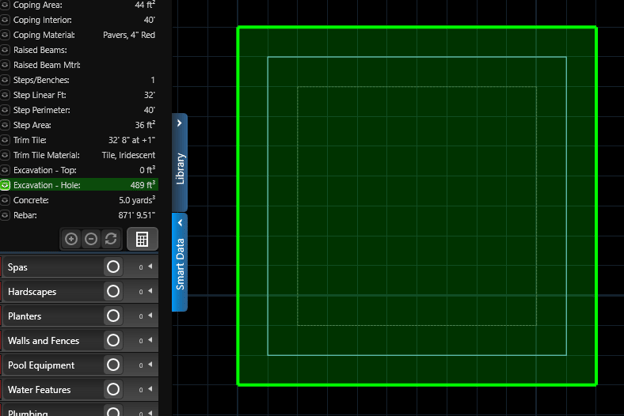
- In configuration, set wall offset to 1 ft and set floor offset to 0.
- Without the wall offset, this scenario would excavate 328 cubic ft. With the wall offset it now excavates 489 cubic ft.
- This is because the new outer wall area is 44 square ft, but instead of digging down 4 ft to the pool bottom, we dig down 2 ft to the top of the bench. So 328 + (44 x 2) is 416 cubic ft. Additionally we dig out steps by the same 1 ft wall offset for another 73 cubic ft bringing the total to 489 cubic ft.
- If the bench only covered half of the pool perimeter, then half of the outer wall area would be dug down 2 ft (to the bench top) and half would be dug down 4 ft (to the pool bottom).
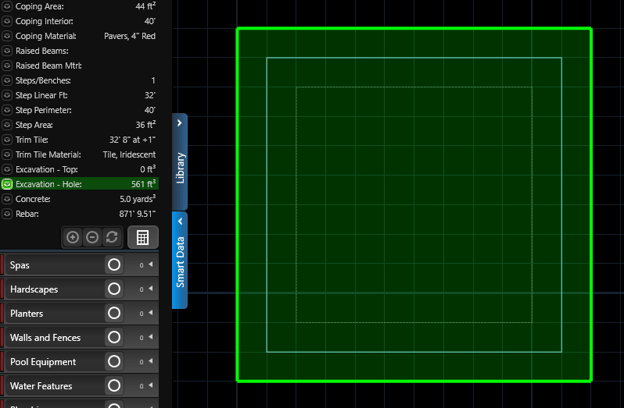
Example 5 - Both Offsets with Steps and Benches
- Same setup as in Example 4.
- In configuration, set wall offset to 1 ft. and set floor offset to 6 inches. These are the default settings.
- See that excavation has now gone up from 489 cubic ft. to 561 cubic ft. This is because we’re now digging down an extra 6 inches across the whole expanded area of the pool, regardless of benches.
- So 12’x12’x0.5’ (72 cubic ft.) is the additional volume of dirt removed in this scenario, which when added to the original 489 cubic ft. gives us the new total of 561 cubic ft.
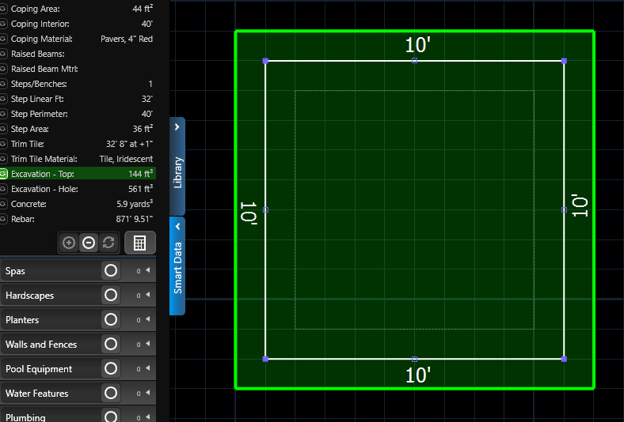
Example 6 - Both Offsets, Steps and Benches, and Terrain
- Same setup as in Example 5.
- Select the pool and set its height to -1 ft. This has the effect of lowering it below the terrain, meaning we’ll need to excavate more dirt.
- See that Excavation - Top stat now has a value of 144 cubic ft. This is the extra 1 ft of dirt on top of the full pool shape, including its offset wall (12x12x1).
- Note the Excavation - Hole stat remains unchanged..
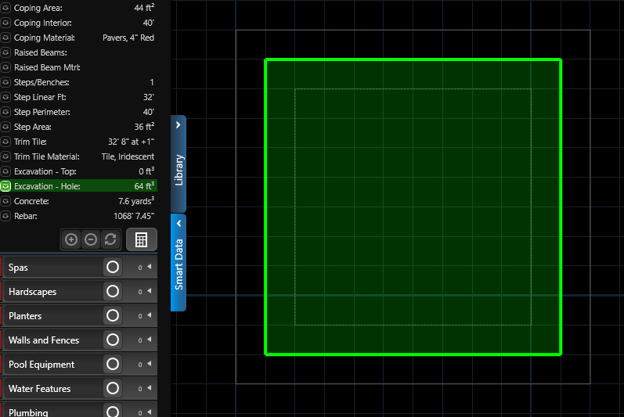
Example 7 - Raised Pool
- Same setup as in example 6.
- In configuration, set both wall offset and floor offset to 0.
- Select the pool and set its height to 3 ft. This raises it above the terrain, but the terrain will still need to be partially dug out.
- See that excavation is now 64 cubic ft. This is because the terrain is below the level of the bench, so only the interior below the bench needs to be dug out.
- The bench interior is 8’x8’, and the terrain is 1 ft above the bottom of the pool, so 8’x8’x1’ is 64 cubic ft.
Example 8 - Sloped Terrain
- Draw a 10’x10’ pool, flat 4’ depth (no benches), and set its height to 0 ft.
- Make sure Pool Cove is off.
- In the terrain stage, modify the slope so that it slants from -4 ft. to +4ft. across the region occupied by the pool.
- See that the Excavation - Top stat is around 160 cubic ft. and the Excavation - Hole stat is around 300 cubic ft. If you add these numbers together you’ll get around 360 cubic ft., which is just a little bit less than the 400 cubic ft. if the same pool was on flat ground. This is because of the slant of the terrain, there is about as much dirt to remove above the pool top as there is below.
Staircases
Displays the Step Count and Run, Step Rise, Total Run and Rise, Angle and Stringer Length
-Nov-09-2023-10-35-49-3387-PM.png?width=688&height=411&name=image%20(1)-Nov-09-2023-10-35-49-3387-PM.png)
Materials
Pools, Spas, and Water Features
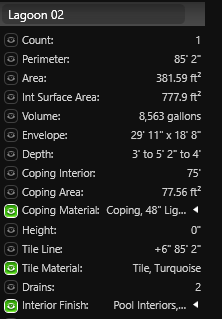
Interior Finish: Name of the interior material.
Coping Material: Name of coping material.
Tile Material: Name of tile line material.
Spillover Material: Name of material inside a pool or spa spillover.
Raised Beam Material: Name of material on a raised beam that faces a pool or spa.
Hardscape
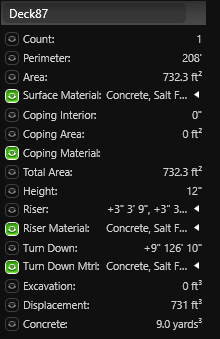
Surface Material: Name of the top surface material.
Coping Material: Name of coping material.
Riser Material: Name of material on the front face of hardscape that meets hardscape. Example: Front of step or raised area
Turn Down Material: Name of material on the front face of hardscape that meets softscape. Example: Grass or planter bed.
Wood Deck
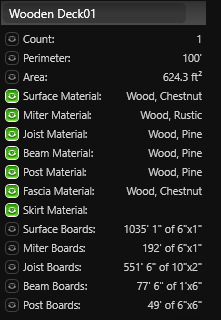
Surface Material: Name of the top surface material.
Miter Material: Name of miter board material.
Joist Material: Name of material on the joists.
Beam Material: Name of material on the beams.
Post Material: Name of material on the posts.
Fascia Material: Name of material on the fascia.
Skirt Material: Name of material on the skirt.
Library Items
Common Name: Name of library item or plant.
Botanical Name: Name of the plant if Botanical is selected in Configuration.
Drains: Count of drains inside the pool, spa, or water feature.
Lights: Count of lights inside the pool, spa, or water feature
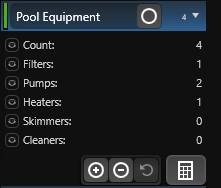 Filters: Count of filters in the project.
Pumps: Count of pumps in the project.
Heaters: Count of heaters in the project.
Cleaners: Count of cleaners in the project.
Skimmers: Count of skimmers in the project.
Water Features
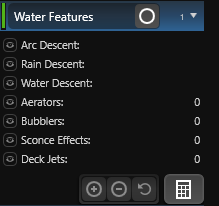 Arc Descent: Length of arc descent.
Rain Descent: Length of rain descent.
Water Descent: Length of water descent.
Note: When multiple descents are inserted, it will show the length of each descent in the project.
Aerators: Count of aerators in the project.
Bubblers: Count of bubblers in the project.
Sconce Effects: Count of sconce effects in the project.
Deck Jets: Count of deck jets in the project.