The Terrain Stage allows you to customize the terrain of your design to create multiple slopes and elevations.
In this stage, there are different tool sets for the 2D and 3D views. In 2D, the Single Slope button sets a general slope for the entire property. The Multiple Slope button allows complex elevations and slopes to be created. The toolset in 3D allows you to make further adjustments and paint the terrain.
NOTE: Most of the work in this stage will be done in 2D.
Terrain Overview Video 🎥
2D Stage Options – Single Slope
The Terrain Stage has 2 unique controls under Stage Options in 2D.
The first option is Single Slope. With Single Slope, you have the ability to set the general grade of the property. With these controls you can adjust the slope that runs through the entire property.
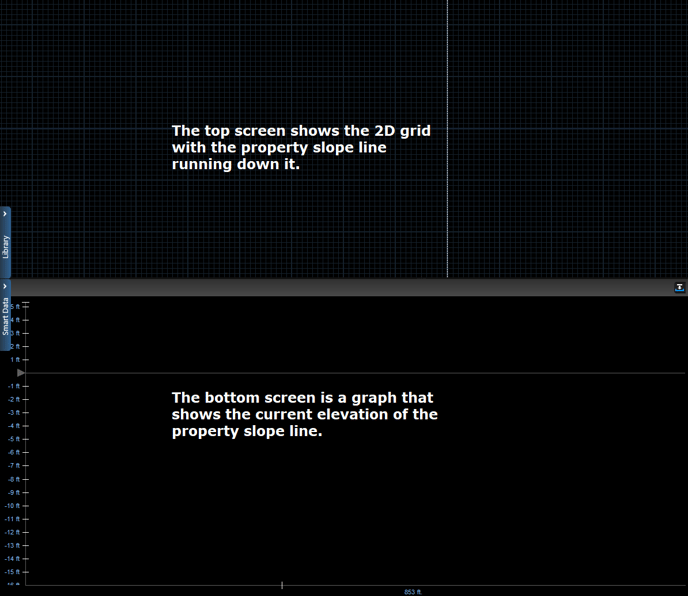
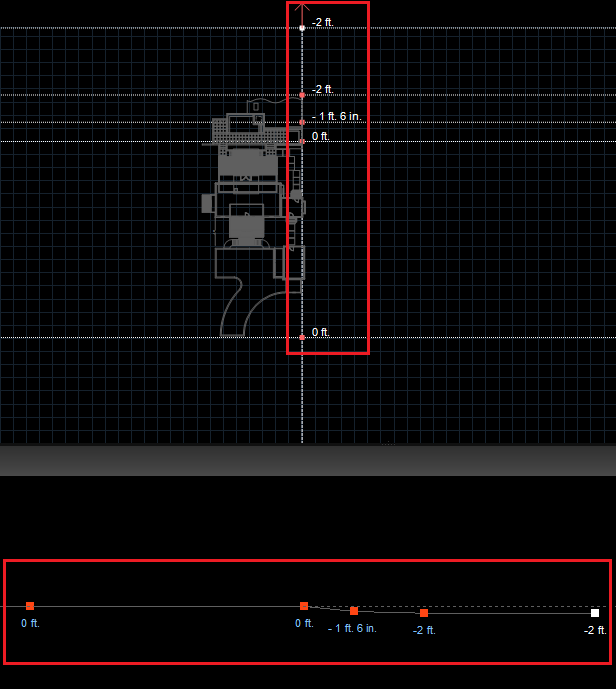
When Single Slope is active, the 2D view is divided into 2 screens. The top screen shows the 2D grid with the property slope line running down it. The bottom screen is a graph that shows the current elevation of the property slope line.
Add/Move/Remove Point: With the Move Tool active, we will add elevation points to the slope line in the top screen. When we set a slope, we work with pairs of points.
Reset: This button resets all changes to the terrain made in 2D. This is not an undo button. It will not undo just the last change you made to the terrain. It will undo every change you have made to the terrain in 2D in your entire design.
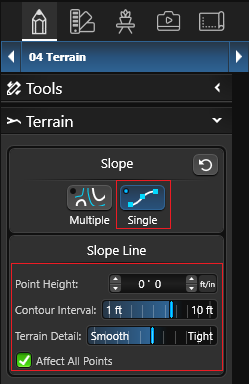
Point Height: This box allows you to customize the exact position of a height point by either clicking on feet or inches and typing a number, or using the arrow buttons, or simply using your mouse wheel while it hovers over one of the two sides. The values in this entry box will adjust as you move points around in the bottom view, and vice versa.
Contour Interval: This slider adjusts how the topography lines appear in 2D. The lower the interval the more lines will appear.
Terrain Detail: This slider will allow you to customize individual points so that they transition smoothly or tightly between other points.
Affect All Points: Checking the box will ensure that the slider affects all points at the same time, equally.
Controls in 2D for Single Slope
When Single Slope is active, the 2D view is divided into 2 screens.
We can change the slope by adding elevation points to the slope line in the top screen and adjusting those points in the bottom screen.
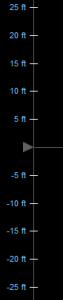 This graph in the bottom 2D view represents various heights above and below zero. You can adjust where zero is relative to your height points by simply left-clicking and dragging the mouse anywhere on the slide graph.
As you zoom in and out, the slide graph will shift the distance values up and down in relation to your zoom level.
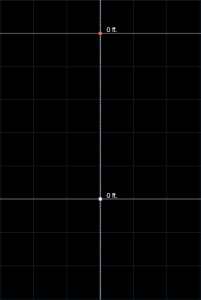
This image shows the top-down view of your drawing with a dashed line representing the direction the slope will point relative to the rest of your project. With the Move tool selected, you can click on the dashed line to insert points. Left-click and drag your mouse to move those points along the length of the dashed line. Right-click on any point to remove it.
Using the Rotate tool, left-click and drag on the dashed line to rotate it around the drawing space.
NOTE: If the slope line does not appear to be rotating or only rotates 45 degrees at a time, check Snaps and make sure Angle Snap is set to None. Now it will rotate freely.
As you create your project, it will be visible in the top view, allowing you to precisely place a height point in relation to a given shape or object.
Using the Pan and Zoom tools at the top of the viewport, you can move around the top or bottom view and see how they relate to each other. As a short-cut, if your mouse has a mouse wheel, rotate this wheel while in the top or bottom views will zoom in and out. Click and hold the wheel down while moving your mouse to pan the view.
Here you can see a portion of the bottom view. With the Move tool, you can click anywhere in this view to add a point. Or left-click and drag the mouse to move an existing point around. Right-click a point to remove a point. Each point will give you the exact height it exists at relative to zero. At the bottom area you can see the distance between two points.

As you move your mouse around the bottom view, tick marks on the bottom and left graph areas will show you exactly where your mouse is allowing you to insert new points at more accurate regions relative to other points and your project as a whole.
2D Stage Options – Multiple Slopes
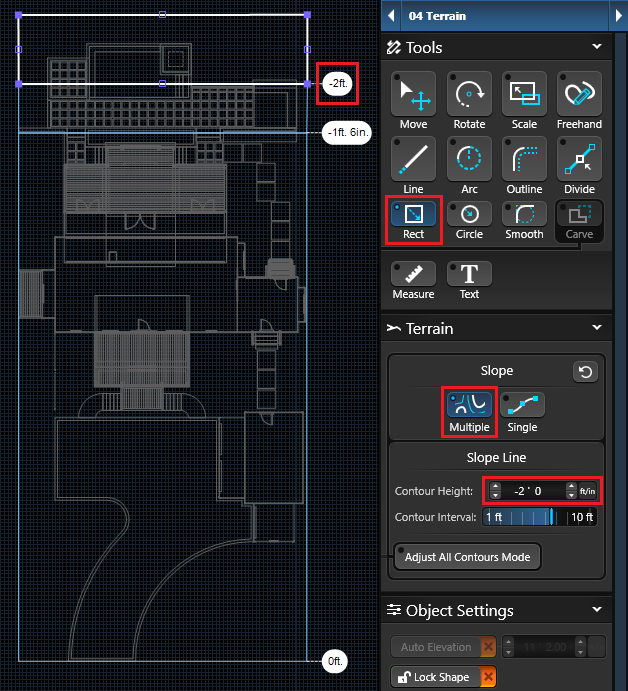
The Terrain Stage has 2 unique controls under Stage Options in 2D. The second option is Multiple Slopes.
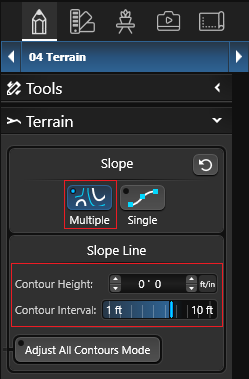
Click the Multiple Slope button to activate it. Once we select this option, the property will reset to zero.
We can freely switch between single and multiple slopes, but only the current selection will be active in the project.
Contour Height: This box allows you to customize the exact position of a contour height by either clicking on feet or inches and typing a number, or using the arrow buttons, or simply using your mouse wheel while it hovers over one of the two sides.
Contour Interval: This slider adjusts how the topography lines appear in 2D. The lower the interval the more lines will appear.
Every line or arc segment drawn in this stage will appear in 3D as topography lines.
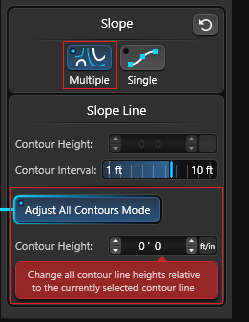 Adjust All Contours Mode: Activate this mode to adjust all contour lines relative to the currently selected contour line.
Contour Height: This box allows you to customize the exact position of the selected contour height for Adjust All Contours Mode.
All contour line heights will be adjusted relative to the selected contour line. It is recommended to set the area around the house to a height of 0 feet.
Controls in 2D for Multiple Slopes
In the 2D view, you have the ability to draw lines and arcs to set the topography of the property.
Lines drawn in Multiple Slopes do not have to be complete shapes.
You can also import plot plans and blueprints to trace the topography lines or import an AutoCAD files and set a contour height to each line.
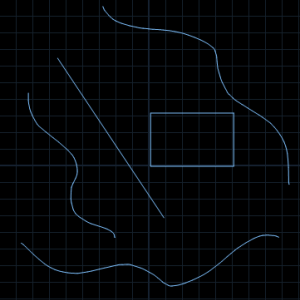
The image shows the 2D view with contour lines drawn with the Line, Rectangle, Arc, Circle and Freehand tools. Use the drawing tools to add contour lines and set the property’s terrain elevations. Each contour line can be given a different height in the Panel.
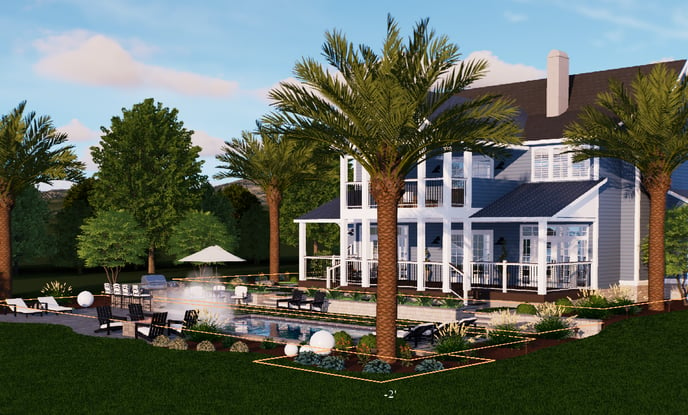
Head to 3D to see the topography and elevations.
Single line and arc segments can be drawn to create the contour lines. To end a line segment without completing the shape, Left-Click on the last point or press Esc.
Auto Level Terrain
When you draw a complete shape and set the height, all terrain inside the shape will remain level.
Everything inside the shape will have a level elevation based on the value entered in the Contour Height box.
Topography Lines
As you create topography lines, they will be visible in 2D and 3D, allowing you to precisely place a contour line in relation to a given shape or object.

Controls in 3D
In the 3D view, you have the ability to see the topography lines created in 2D Multiple Slope and create custom slopes and elevations. With these controls you can create realistic terrain by naturally shaping the ground and painting it with materials.
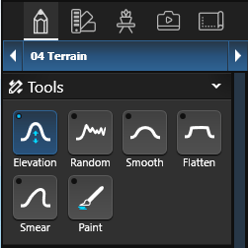
The six terrain tools will replace the regular tools when in 3D in the Terrain Stage.
Elevations created in the 3D view will appear as topography lines in 2D.
All the terrain tools require that you hold down CTRL on your keyboard to activate them. Holding down CTRL will switch the functionality of your mouse buttons from zoom and pan to whichever terrain tool you have selected.
When a terrain tool is selected, the terrain brush will display with the mouse pointer. The area inside the brush is the area that will be affected by the tool.
The elevation of the currently covered area will be displayed next to the mouse pointer. The shape and the size of the brush can be changed under Stage Options.
3D Tools
To activate any of the terrain tools, simply hold down the CTRL key on your keyboard. This will change the functionality of your mouse buttons from zoom and pan to the specific terrain tool you have selected.
Elevation: This tool will elevate and lower the terrain. With the CTRL key held, your left mouse button will elevate the terrain and your right mouse button will lower it. This is the primary terrain tool.
Random: This tool will create a random pattern of peaks and valleys when elevating or lowering terrain. This will give the terrain a more natural appearance. With the CTRL key held, your left mouse button will elevate the terrain and your right mouse button will lower it.
Smooth: This tool will smooth the terrain to make it more consistent. Perfect for mounds.
Flatten: This tool will even out the surface of the terrain. Perfect for packed earth. If Auto Height is selected under Stage Options, it will flatten based on the average height inside the brush.
Smear: This tool allows you to push or smear a region of the terrain. Useful for creating cliffs or turning a cliff into a smooth grade slope.
Paint: This tool allows you to paint materials directly onto the terrain for natural coloration. Each material used will occupy a material slot in Paint Brush Material. Up to 8 materials can be painted. The longer you use the tool, the more intensely the material will be painted.
3D Stage Options
The Terrain Stage has unique controls under Stage Options in 3D.
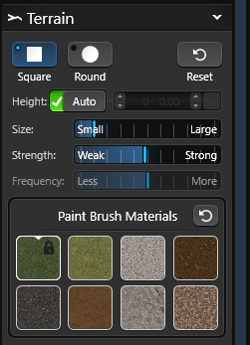 Brush Shape: Change the brush shape between circle or square by selecting Square Brush or Round Brush Button
Reset Slope: This button allows you to revert all modifications made to the terrain in the 3D view.
Please note that this button does not function as an undo button. It will not only undo the last change you made, but it will undo all changes you have made to the terrain in the 3D view throughout your entire design.
You have the option to undo the Reset Slope action by using the Undo button.
Height: This box will allow you to set a height limit for the selected tool.
Auto Height: Checking this box will disable the setting in the Height box and automatically choose the height.
Brush Size: This slider controls the size of the Terrain Brush and the area it will affect.
Brush Strength: This slider increases the intensity the tool will exert on the terrain.
Frequency: Only available with the Random tool, this slider increases the frequency of the peaks and valleys.
3D Paint Brush Material
In the 3D view, you can find the Material Swatches under Stage Options. You have the option to paint with 7 different materials in any design.
The first swatch represents the material that is currently applied to the terrain in your project.

Painting: To select a material, simply left-click on the swatch and begin painting with it. When a swatch is selected, an X will appear.
Changing Materials: To change the material in any swatch, simply double-click on the swatch. This action will automatically open the Materials Library, where you can select a new material from the available options. The new material you choose will replace the existing material in your design and in the swatch.
Reset: To remove any materials you have painted in your design, simply click on the Reset button. This will easily clear the painted materials from your project.
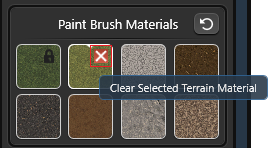 To remove a selected material from your design, simply select the Material Swatch and click on the X button. This will remove the painted material from your design, but it will not clear or delete the Material Swatch.