In the Materials Stage, you can apply materials from the library to surfaces, objects and library items in your design.
Materials Library
The Materials Stage has a unique library different from other phases. The Materials Library contains materials you can apply to surfaces in your design.
The Materials Library Tab is located on the left side of the Viewport. Single-click the left mouse button to expand the library. When you enter the Materials Phase the Materials Library will automatically open.
Materials can only be applied in 3D. You must select the surface before you can apply a material to it.
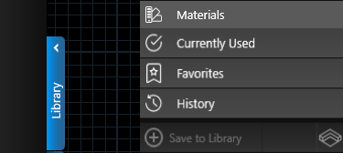
The Library has a Search Bar at top and 4 Tabs: Materials, Currently Used, Favorites, and History. There are two ways to view the Library, the List View and Thumbnails Panel.
Materials Library List and Thumbnails Panel
List View
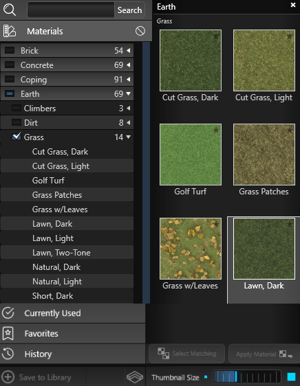
Materials are sorted under Category bars which can be collapsed and expanded as necessary. The number displayed to the right represents the number of material options available in that Category.
To clear a selected material, left click on the Category name. This will remove the check mark. To deselect all materials you have selected, left click the Deselect Button. This will remove the check marks from anything you have selected.
Thumbnails Panel
You will see a preview of materials that have a check mark next to their name in the List View. The materials are sorted by Categories, the Types are listed below the Category.
 Panel Size: You have the ability to resize the width of the Thumbnails Panel by hovering your cursor on the edge of the panel. When the cursor becomes a double arrow, hold down the left mouse button to resize the panel.
Thumbnail Size: You have the ability to scale the size of the thumbnails by using the Thumbnail Size Slider at the bottom of the Thumbnails Panel.
Clear Thumbnails: To clear a Material, left click on the check mark next to the Category or Type name to remove the check mark.
To deselect all materials you have selected, left click the Deselect Button. This will remove the check marks from anything you have selected.
Select Matching: With a material selected in the list, this button will select all the surfaces that have the selected material applied. This makes it easy to quickly replace an applied material with a new one on multiple surfaces.
Apply Material: This button will apply the currently selected material onto the currently selected surface or surfaces in the design. Materials may also be applied by double left clicking on the material name or preview picture.
Thumbnail Slider: This slider will increase or decrease the size of the thumbnail preview pictures.
Material Template Buttons
Custom materials can be created by using the Color Wheel or HSV controls located in the panel. You can save your custom materials to the library for future use.
For more information, see Customize Materials.
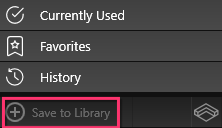
Save to Library: The Save button will allow you to save materials you have customized to the library.
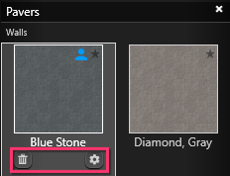
Delete: The Delete (Trash Can) button will permanently delete a custom material from the library.
Edit: The Edit (Gear) button is used to edit custom materials you have saved to the Materials Library.
Quick Selection
Quick Selection allows you to select all objects of a specific type at once. This allows you to change all these objects to the same material with a single click.
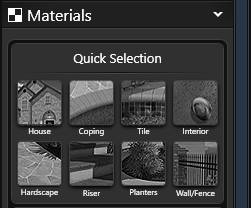
Simply click on the Quick Selection button and you will select all the objects of that type.
For example, clicking on the House button will select all the shapes in the design drawn in the House Stage.
Please Note: If any of the Quick Selection buttons are grayed out, it means your project does not contain any objects of that type, or you are in the 2D view.
Selecting Individual Surfaces
Selecting Surfaces: If you wish to change one individual surface, you may select it by double left clicking directly on it. Selected surfaces will highlight in red. To select more than one surface at a time, hold down the CTRL button on your keyboard and left-click once on each additional surface. At any time, you can cancel your selection by pressing the Select None button.
Selection in 3D in Materials: You will find that selection in 3D in the Materials Phase works differently than in other phases. Instead of selecting and moving objects with the 3D gizmo, you have the ability to select the surfaces of shapes and apply materials.
The red highlighting shows you exactly which surface is selected. The Copy and Paste commands also work differently, you can copy and paste materials on surfaces.
Each different type of shape and library item have a different number of surfaces. Once the shape is selected, double click the individual side to apply a unique material.
Selecting Painted Materials: You are also able to select materials which have been painted onto the terrain with the Paint tool. Each material that has been painted onto the terrain with the Paint tool is its own surface and may be selected by double clicking on it. If you selected any one spot where the material has been painted, it will automatically select every spot where the material has been painted.
If you change a painted material, every spot on the terrain where it has been painted will change. Multiple materials can be painted on top of one another, layering multiple surfaces. This may make it difficult to select just one material.
Material Manipulation
With these controls you can adjust materials you have already applied to surfaces in the design. Select the applied material and then manipulate its appearance with the controls. This is very useful when you need a material to line up and appear properly across a surface or when you want to reflect a certain product or style.
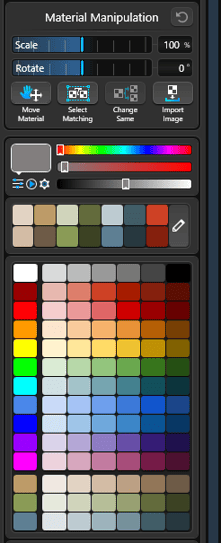 Scale: Use the slider or type in a value and press enter, to scale the pattern of the currently selected material. Note: To scale larger than 200%, type in the value and press enter.
Rotate: Use the slider or type in a value and press enter, to rotate the pattern of the currently selected material.
Move Material: This button will allow you to pan the selected material. This allows you to adjust and line up materials such as the plank lines in wood materials to appear properly across a surface.
Select Matching: This button will you to select objects with the same material. With a surface selected in the project, clicking on the Select Matching button will select all objects with the same material.
Import Image: This button allows you to create custom materials by importing graphics files. For more information see Customize Materials
Reset Material: This button allows you to reset a customized material back to its library default. This button will reset all changes made to the material. Pressing Reset will reset every material you currently have selected.
3D Grass (Vip3D Exclusive)
Double-click the Grass to select it. With the Grass is selected, Turn On 3D Grass in the Panel under Object Settings.
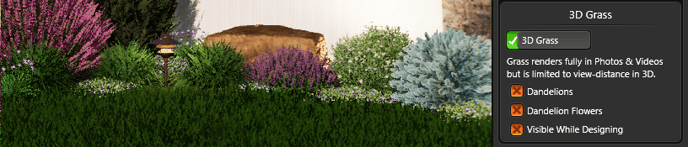
To see 3D Grass in Design Stages, add a checkmark next to: Visible While Designing.
In Design Stages, 3D Grass is only a preview with a limited view distance.
3D Grass will fully render in Photos and Videos.
Search Bar
The Search Bar allows you to search for materials in the Library by name. This is the fastest way to find a material and apply it in the design. The search feature will search material names, categories and types.
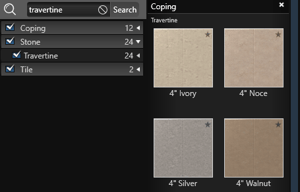
Searching for Materials: To search for a material, simply type the name of the material into the Search bar and press the magnifying glass. The results of the search will appear below.
Single words or groups of words may be entered into the Search Bar. You may type in a specific material name such as White Peppered Rock or type in a category name such as Earth.
Materials Found by the Search: Materials found by the search may be selected by left clicking on the name of the material or the thumbnail picture.
The material may be inserted by double left clicking on the picture or name of the material or using the Apply Material button below.
Materials found by the search are listed alphabetically by material name. The location of the material in the Library is also displayed. As with other materials in the Library, materials found by the search may be added to Favorites by left clicking the star icon in the upper right corner of the thumbnail preview.
Materials Tab
The Materials Tab contains materials which can be applied to surfaces in your design. This includes materials for use on the ground such as grass, dirt, and sand; and materials for structures such as concrete, stone and brick materials. This tab also contains specific materials from vendors and manufacturers.
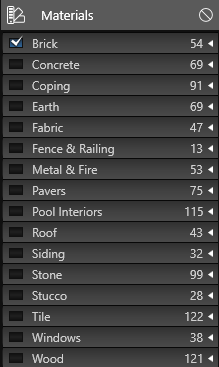 Materials are sorted under Category bars which can be collapsed and expanded as necessary. Left clicking on a Category name will expand or collapse that Category.
Left clicking on the box next to the Category name will add a check mark and an image of each material will appear to the right of the list in the Thumbnails Panel.
Materials may be selected by left clicking on the material picture or name. The materials may be applied by double left clicking on the picture or name or using the Apply Material button below.
Currently Used Tab
The Currently Used Tab displays a list of all the library materials currently applied to surfaces in the design. This makes it easy to see which materials have been applied to surfaces in the design and apply those materials on more surfaces.
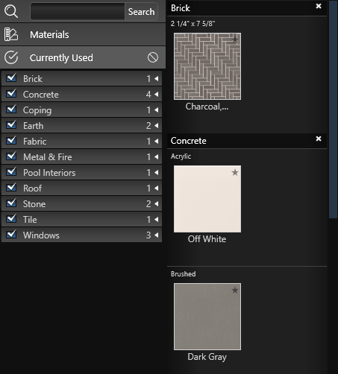
Materials in the Currently Used Tab are listed alphabetically by Category name. The Currently Used Tab includes all materials that have been applied to the surfaces of shapes such as houses, roof, tile and terrain.
Vendor products are also included in this list with the name of the vendor, their website and the specific product name.
As with other materials in the library, materials in the Currently Used Tab may be added to Favorites by left clicking the star icon in the upper right corner of the thumbnail preview.
Favorites Tab
The Favorites Tab allows you to create a list of materials you commonly use for quick access.
Adding Materials to Favorites: Any material in the library may be added to this list by left clicking the star icon in the upper right corner of the thumbnail preview. Favorites have a yellow star.
Removing Materials from Favorites: When viewing the favorites list under the Favorites Tab you may remove any material by left clicking the star icon in the upper right corner of the thumbnail to remove the item from Favorites.
Auto-Favorites: The software adds a material to your auto-favorites once applied 25 times. Auto-Favorites have a blue star in the preview picture. This makes it easy to find and apply the materials you use most often into your designs.
History Tab
The History Tab displays a list of the last 100 materials you applied in projects. This makes it easy to see all the materials you recently applied in designs. As with other materials in the library, materials in the History Tab may be added to Favorites by left clicking the star icon in the upper right corner of the thumbnail preview.
Using Copy and Paste with Materials
Materials that have already been applied to surfaces in your design may be copied and pasted using the Copy and Paste commands found in the Application Bar. In other Phases, these commands are used to copy and paste objects. Here in the Materials Phase, these commands allow you to copy and paste materials. This is the fastest way to apply materials you are currently using in your design to new surfaces.
 Copying a Material: In order to copy a material, you must first select a surface the material is applied to by double clicking on the surface.
You can then copy the material by going to the Application Bar and selecting Copy or pressing CTRL+C on your keyboard. Nothing will happen on your screen, but the material will be copied. Please note that the copy command will not work if you have more than one surface selected.
 Pasting a Material: You may paste a copied material onto any selected surface or group of surfaces.
Simply select Paste from the Application Bar or press CTRL+V on your keyboard. The material you copied last will then be pasted onto the selected surface or group of surfaces.