With Automatic Data, similar object types are categorized into seven sets and automatically load into your construction plans.
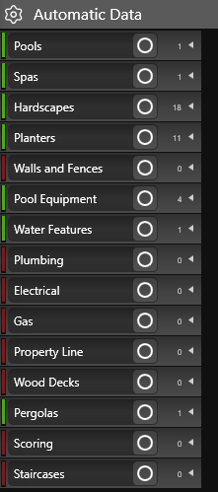
- Pools
- Spas
- Hardscapes
- Planters
- Walls and Fences
- Pool Equipment
- Water Features
- Plumbing
- Electrical
- Gas
- Property Line
- Wood Decks
- Pergolas
- Scoring
- Staircases
Objects do not need to be selected to calculate the data. These categories will automatically display everything from the stage.
If there is no data for a category, a Red bar appears to the left of the category name.
Left-click the category name to view the data being calculated.
In 2D or 3D, left-click the O selection circle, to select the corresponding objects.
TIP: If you’re not in the stage where the shapes were created, turn ON Select Any Object.
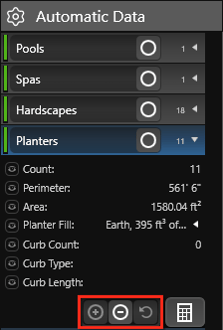 The buttons located at the bottom of each Automatic Data category, allow you to add objects to the set, remove objects from the set or reset the set.
Plus: To add objects, click the plus button. Note: You can only add objects from the same stage in Automatic Data sets. To add objects from multiple stages, press the Add Custom Data button.
Minus: To remove objects, click the minus button.
Reset: To reset the default, click the reset button.
For example, if you do not want to include a shape like an existing sidewalk or patio in an automatic data set, simply select the object and click the minus button.
Or select the objects you need from multiple stages for a specific calculation and create your own Custom Data Set.
Creating Custom Data Sets (Vip3D Only)
Use Custom Data to create the specific data sets you need to automatically load into your construction plans. You can also save these sets to load in future projects.
Unlike Automatic Data, Custom Data sets can contain different object types (i.e. Pool and Deck shape).
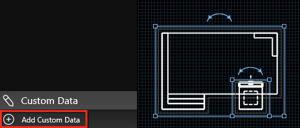
- In 2D or 3D click on the object or objects(s) you’d like to see calculated in the custom data set. (Turn ON Select Any Object.)
- Hold down CTRL + Click each Object.
- Once the objects are selected, click the Add Custom Data button at the bottom of Smart Data to create a new custom set.
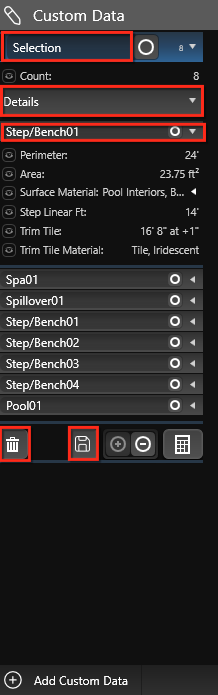
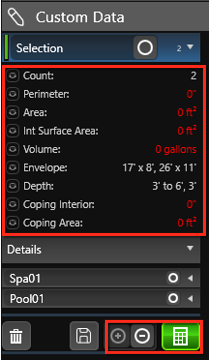
Selection: Double-click to rename the set. This name should be descriptive of the objects in the set. This name will appear on your “Page Layout” construction plan.
Combined Data: Data that pertains to all object types in the set will be displayed under Selection.
Details: Left click Details to expand or collapse the list of objects in the set. Here you can find the full calculations for each object individually.
Object Name: Left click the name to display detailed data for that object. To rename the object, double-click on the name and type in a new value. This will update the name in Smart Data and under Object Properties.
Trash Can: Left click the trash can to remove the custom data set.
Save: Left click the Save icon to save the custom set as a default to load in all new projects.
Note: If the custom data set contains project specific objects, the set will appear blank in future projects.
Editing Custom Data Sets (Vip3D Only)
 Once you create a Custom Data Set it is easy to edit. Select the object or object(s) you would like to add or remove and use the plus or minus buttons at the bottom.
When a change is made, such as moving the shape or adjusting height, the data will become red meaning it is stale and must be re-calculated.
Plus: Left click the Plus button to add the selected object to the set.
Minus: Left click the Minus button to remove the selected object from the set.
Calculator: Left click the Calculator to recalculate and refresh the data. When data is calculated, all data will be white in the panel.