Vip3D Members have access to the Meta Quest 3 Virtual Reality experience. The Meta Quest 3 uses state of the art displays and options to immerse your clients in the 3D project you’ve designed for them.
NOTE: You may need a new computer. Check our Hardware Recommendations
Meta Quest 3
When you enter Presentation Mode while using Meta Quest 3 hardware, you and your clients will feel as though you’re actually in the newly designed yard, in vivid virtual reality.
Setting Up Virtual Reality: In order to share your design with your clients in virtual reality, follow these steps:
- Restart the computer.
- Plug in the Meta Quest 3 headset.
- Start the Oculus Software.
- Make sure the Meta Quest 3 headset is reading connected to the computer.
- Start Vip3D.
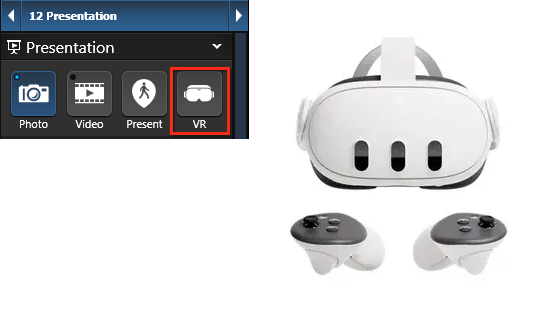
- Head to Stage 12: Presentation.
- Activate the VR Button in the Panel.
- When it prompts you to Allow access to data, select Deny.
- After this, you’ll be prompted to Enable Quest Link. When this happens, select Enable.
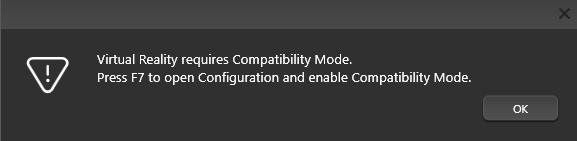
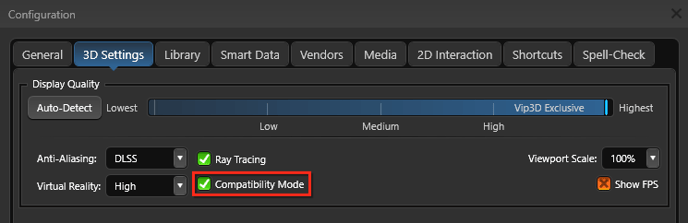
Version 3: Enable Compatibility Mode in 3 Quick Steps:
-
- Press F7 to open the Configuration Menu
- On the 3D settings tab, turn ON Compatibility Mode
- Press Apply and then Ok.
Note: Your software will need to restart
Navigation
Navigation in the Oculus Presentation Mode is simple. When exploring with the Meta Quest, you have 2 options to navigate the design:
- Meta Quest Remote
- Photo Mode Locations
Meta Quest Remote
When entering Meta Quest Presentation Mode, a warning screen from the Oculus software will appear.
The Meta Quest remote is used to move in Presentation Mode.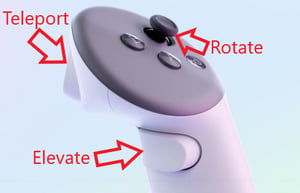
Rotate: Use the control stick to turn the viewport left or right
Elevate: Use the grip button to elevate the viewport
Teleport: Aim the reticle to the location you’d like to teleport to then squeeze the trigger
Photo Mode Locations
Use Locations saved in Photo Mode to quickly move from one area of the project to another.
Saved Location: To move to a specific location saved in Photo Mode, Press the location number. For example: To move to Location 02, Press 2.
By default your starting point in Presentation Mode is the first Location Slot. To start in a different location, double click on the Location Slot to set it.
Sound
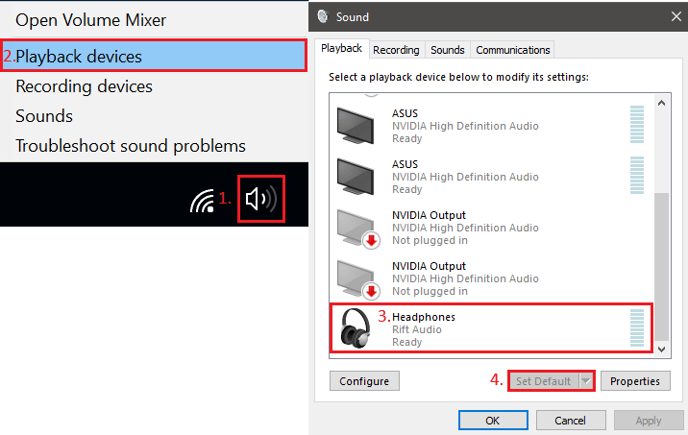
To experience sound through the Meta Quest 3, assign Meta Quest as the default audio device for the PC.
Follow these steps to make this change:
- In the bottom right of your screen, right click on the volume control icon
- Left click on Playback Device
- Left click on Headphones Rift /Meta Quest Audio device
- Left click on Set Default
Windows 10
Windows 11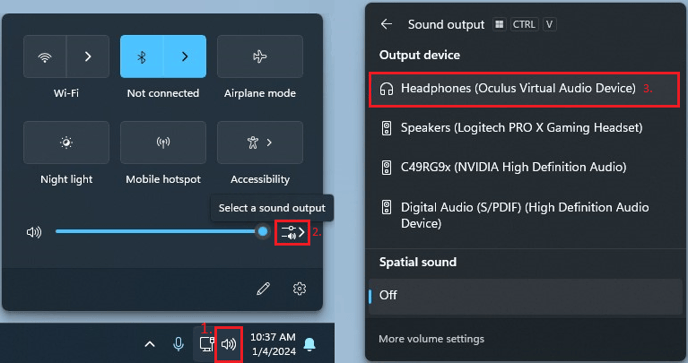
Troubleshooting
Oculus headset is not being recognized in Presentation Mode
- Ensure headset is properly connected to the PC with Meta Quest Link Cable
- Check Meta Quest is not in sleep mode
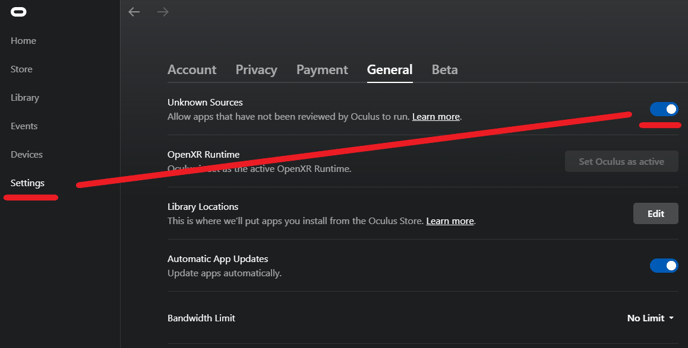
- Toggle Trust Unknown Sources in the setting menu of the Oculus App
How to Connect the Meta Quest 3
Meta Quest 3 requires a supported Meta Quest Link cable to connect to the computer.
Message: Meta Quest Not Connected
For the Presentation Mode to use the Rift hardware, the Oculus software must be running on the PC. It should start automatically when entering Presentation Mode.
If the Oculus software does not automatically launch, follow these steps to manually start the software:
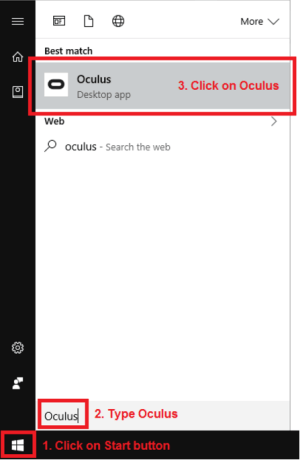
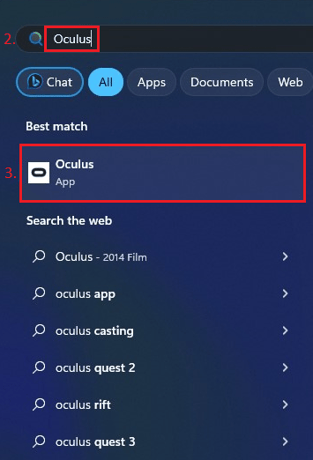
- Left click on the Start menu (Windows icon) in the bottom left of your screen
- Type Oculus to find the software
- Left click on the Oculus Desktop app
Windows 10 Windows 11